Gaggia Classic Pro Mods: The Complete Ladder (2026)
The Classic Pro is the most modded entry espresso machine in the hobby, but the ladder changed in 2023: the Evo Pro now ships with the 9 bar spring the internet still tells you to install first. Here is what your machine actually needs, in order, with the parts that fit it.

Some links below are affiliate links. If you buy through them, BrewTested may earn a small commission at no extra cost to you. We only recommend gear that passes our Fit Analysis, and we publish the ones that don't.
Which mods your machine needs depends on which machine you own, and most guides have not caught up. The 2023 Gaggia Classic Evo Pro ships with a 9 bar OPV spring from the factory, so the single most-repeated piece of Gaggia advice on the internet, do the 9 bar spring first, is already done on the newest machines.
- Classic or Classic Pro from 2022 or earlier: start with the 9 bar OPV spring swap. Roughly $15-30 and about 20 minutes, and it fixes the machine's biggest stock flaw
- 2023 or newer Classic Evo Pro: skip the spring entirely. Your first real upgrade is a PID, roughly $145-200 as of mid-2026
- Not sure which you have: measure before you buy. A blind basket and a brew pressure gauge tell you your actual number in ten minutes
- Every generation, after that: a PID for temperature control, then a zero-risk quality-of-life layer (bottomless portafilter, precision basket, puck screen) that never involves opening the case
The tier to skip, or at least to buy last: precision baskets and puck screens are refinements, not fixes. They will not rescue bad puck prep, and buying them before the OPV and PID work is the most common way people spend $80 on a Classic and hear no difference.
One honest caveat before any of it: the OPV and PID mods mean opening a mains-powered appliance, and they void your warranty. If that makes you uneasy, buy a pre-modded unit from a reputable seller or skip modding entirely. The stock machine still makes espresso.
This guide synthesizes owner reports, community documentation, manufacturer specifications and kit-maker instructions. BrewTested has not performed these installs on our own bench, and we say so because you should trust guides that tell you where their information comes from.

Start here: what your machine actually needs
| Your machine | Needs the 9 bar OPV spring? | Needs a steam wand swap? | Start with |
|---|---|---|---|
| Gaggia Classic, pre-2015 | Yes, but source carefully — the common Amazon spring kits are listed for 2018+ | Yes: plastic panarello from the factory | The wand swap, then the spring |
| Gaggia Classic, 2015-2018 (RI9403 era) | Yes | Yes: plastic panarello from the factory | The OPV spring, then the wand |
| Gaggia Classic Pro, 2019-2022 | Yes | No: factory two-hole commercial wand | The OPV spring, then a PID |
| Gaggia Classic Evo Pro, 2023-present | No — ships with a 9 bar OPV spring | No | A PID, or nothing at all |
| Unsure which you have | Measure it before you buy a spring | Look at the wand: a fat plastic sleeve is a panarello | A blind basket and a brew pressure gauge |
The parts, with real links
Every link here goes to a specific product rather than an Amazon search page, so you can check the actual listing and its fitment notes. Selected on published specifications, stated compatibility and owner reports; BrewTested has not installed any of these on its own bench and claims no measurements. Prices in this category move constantly, so treat any figure as an approximate mid-2026 street price. Check your machine against the table above before you buy the spring or the wand — on a current machine, two of these are the wrong purchase.
Rung 1, 2018-2022 machinesDistro Coffee Labs 9 bar / 6 bar OPV spring set
304 stainless springs, model DCL004, sold as a pair so you can run 9 bar and then experiment with 6 bar. Listed as compatible with 2018-and-newer Classic machines, which is the fitment line worth reading twice: older Classics and the 2023+ Evo Pro are both outside it, for opposite reasons. Install is a 10mm wrench and a screwdriver.
Check price on Amazon Rung 2, ships from the US
Sungaze PID kit, brew + steam + flow control
The PID rung without a transatlantic shipping window. An XMT7100 controller in a black enclosure, a PT100 Class A RTD probe with M4 threading, both solid-state relays, and a flow-control switch for pre-infusion, listed for the Classic, Classic Pro and Classic Evo Pro alike. Listed at 1.5 lb. Around $170 as of mid-2026, against $189.50 for Auber's US kit with programmable pre-infusion.
Check price on Amazon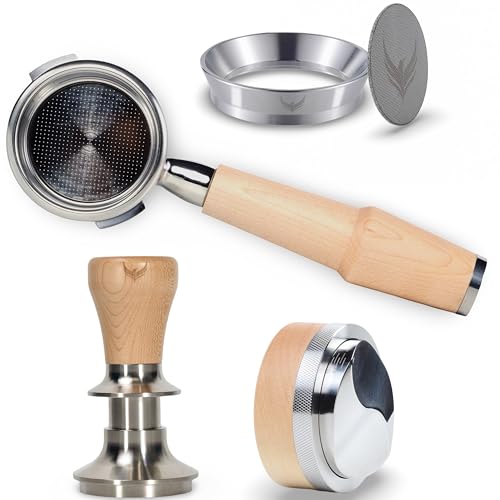 The whole zero-risk tier, one box
KNODOS 58mm tool kit for Classic / Classic Pro / Evo Pro
A four-piece set listed specifically for the Classic, Classic Pro and Classic Evo Pro: maple-handled bottomless portafilter, calibrated tamper, dosing funnel with a puck screen, and an adjustable distributor. If you want the entire quality-of-life layer without cross-checking four separate fitment notes, this is the shortcut. Nothing in it requires opening the machine, so none of it touches your warranty.
Check price on Amazon Portafilter only
Normcore 58mm naked portafilter, walnut handle
The pick if you already own a tamper you like. Listed for the Classic Pro, Carezza and Cubika Plus with an 18g basket included and an American walnut handle, listed at 0.73 lb. Normcore also sells a unibody version with a built-in 0.28mm high-extraction basket rated for 18-22g, which removes the basket-fit question entirely.
Check price on Amazon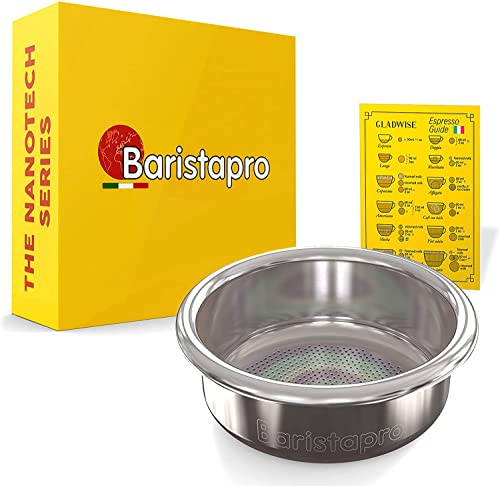 Precision basket
IMS Baristapro Nanotech 58mm precision basket, 18g
The basket the community keeps converging on, with a more consistent hole pattern than stock. It is ridgeless, meaning there is no groove for the portafilter's retaining clip to lock into: owners run ridgeless baskets on the Classic routinely, but they are held less positively, which matters if you knock pucks out hard. IMS also sells Big Bang baskets in 14-16g, 18-20g and 20-22g bands if your dose sits outside 18g.
Check price on Amazon Puck screen
IMS puck diffuser screen, 58mm (E&B Lab)
Sits on top of the puck to spread the first water contact and keep the shower screen clean. Honest framing: this is a small, real improvement and a maintenance convenience, not a fix for channeling. A 0.5mm ultra-thin Big Bang version with a magnet pin is easier to lift out of a hot basket.
Check price on Amazon Pre-2019 machines only
Rancilio Silvia V1/V2 steam arm kit
Sold under Rancilio part number 1449141: the bolt-on swap that replaces the plastic panarello on older Classics with a bare commercial wand you can actually texture milk with. Do not buy this for a 2019+ Classic Pro or an Evo Pro — those already ship a two-hole commercial wand from the factory, and the swap gains you nothing. Fitment on post-2015 machines is inconsistent between sellers, so read the listing's compatibility line against your model year.
Check price on Amazon Diagnostic, buy this before the spring
58mm blind basket
A solid stainless disc with no holes, listed for the Gaggia Classic and other 58mm machines. It is the standard backflushing part, and it is half of the pressure test above: with the flow blocked, a gauge reads your true static brew pressure, so you can check the OPV before and after the swap instead of trusting a forum thread about your model year. The cheapest thing on this page and the only one that produces a number.
Check price on AmazonThe mod ladder at a glance
| Mod | Typical cost (mid-2026) | Difficulty | Impact |
|---|---|---|---|
| 9-bar OPV spring swap | $15-30 | Easy: 15-30 min, case top off, basic tools | High on pre-2023 machines, nothing at all on a 2023+ Evo Pro |
| PID temperature control | $145-200 | Moderate: 1-3 hrs, wiring inside the machine, no solder with mainstream kits | High on every generation: shot-to-shot consistency, ends temperature surfing |
| Bottomless portafilter | $25-45 | None: swap and go | Medium: diagnostic window into puck prep |
| Precision basket | $25-40 | None: swap and go | Low-medium: refinement once technique is solid |
| Puck screen | $12-25 | None: rests on the puck | Low: cleaner shower screen, modest help with the first water contact |
| Steam wand swap (pre-2019 machines) | $20-50 | Easy-moderate: bolt-on swap | High on old panarello machines, unnecessary on 2019+ |
| Blind basket + brew pressure gauge | $10-35 | None: lock it in and read the needle | Diagnostic: the only way to know your actual pressure before or after the spring |
What the 2023 change did and did not fix
The Classic Evo Pro arrived in 2023 as a running change rather than a new machine, and Gaggia's own materials describe the headline item plainly: a new over-pressure valve that delivers 9 bar extraction out of the box. Whole Latte Love's launch coverage lists the rest of the revision alongside it — a polished stainless steel 58mm commercial portafilter in place of the older chrome-plated brass one, a steel cover wrapped around the brass brew group that also carries the boiler and pump, and an inert food-safe coating inside the boiler aimed at corrosion and scale.
That kills exactly one rung of the ladder, and only for people who bought recently. If your machine is an Evo Pro, the spring swap that dominates every Gaggia thread written before 2023 is already done, and installing an aftermarket 9 bar spring on top of a factory 9 bar valve buys you nothing.
It does not touch temperature control. Every generation of this machine, Evo Pro included, still runs brew temperature on a simple thermostat, so the PID rung applies identically across the whole table above. If anything the Evo Pro sharpens the case for a PID, because it is now the only stock weakness left.
One caution on model years: the Classic has been sold under overlapping names for decades and sellers are inconsistent about which revision they are listing. If the listing does not say Evo Pro, assume it is not one. And if you bought used, assume nothing — a previous owner may already have swapped the spring, which is another argument for measuring first.
Measure before you mod: the ten minute check
The Classic has no factory pressure gauge, so the only way to know what your machine is doing is to block the flow and read it. The test is standard and it is the same one you use to confirm the mod afterwards.
What you need. A blind basket (a solid 58mm disc with no holes, the same part used for backflushing) and a brew pressure gauge. Gauges come in two forms: one that threads into a spare portafilter, and an inline gauge spliced into the pump line. The threaded-portafilter type is far easier and is what most owners use, but fitment varies by portafilter and thread, so check the specific gauge against your portafilter before ordering — we are not linking one here because we cannot verify fitment across the Classic's many portafilter variants, and a gauge that does not thread on is a wasted purchase.
The test. Put the blind basket in the portafilter, lock it in, run the pump, and read the needle once it settles. That is your static, no-flow pressure.
How to read the number. A correctly calibrated 9 bar valve reads roughly 1 bar higher on this static test, around 10 bar, because pressure drops once water actually has to flow through coffee. So a static reading near 10 is healthy. A static reading of 12-13 is the classic over-pressure symptom and is the machine the spring swap was invented for. Kit makers state this offset explicitly, and it is the single most common reason someone swaps a spring, measures 10 bar, and thinks the mod failed.
Safety, before anything else. Every mod below requires unplugging the machine and opening the case. Inside is mains electricity, a steam-capable boiler, and (on PID installs) wiring that connects directly to heating elements. Unplug the machine, let it cool completely, and treat every wire as live until verified otherwise. Capacitors and the boiler can hold heat and charge after unplugging. Opening the case voids the manufacturer warranty. If any of this is outside your comfort zone, that is a completely valid answer: buy pre-modded or run the machine stock. No shot of espresso is worth a shock or a burn.
Why this machine, specifically, gets modded
Three things make the Classic Pro the hobby's favorite project machine.
It is built like an appliance from another era. A simple boiler, three switches, a commercial-style 58mm portafilter, and a steel case held on by ordinary screws. There is no touchscreen to brick and no proprietary firmware. Parts are cheap and available, and the machine has been fundamentally similar for decades, so the community knowledge base is enormous.
Its two stock weaknesses are both fixable for less than the price of a nicer machine. From the factory, the over-pressure valve (OPV) is set well above the 9 bar that specialty espresso targets, and brew temperature is controlled by a basic thermostat that cycles across a wide band. The first problem costs about $20 to fix. The second costs about $180. A modded Classic Pro plus a good grinder is a setup people genuinely keep for a decade.
The community treats it as a rite of passage. The Espresso Aficionados wiki, r/espresso, and years of forum threads all document these mods step by step, to the point where the community's standing advice is that the Classic is a machine you buy *because* you want to tinker. If you want push-button convenience instead, that is a different machine, and our Bambino vs Gaggia Classic Pro vs Barista Express comparison walks that decision.
Mod 1: the 9-bar OPV spring swap
The problem it solves. Espresso extraction standardized decades ago around roughly 9 bar of pressure at the coffee puck. For most of the Classic's production life Gaggia shipped it with the over-pressure valve set meaningfully higher, and owner measurements commonly land around 11-13 bar static depending on year and unit. Excess pressure pushes water through the puck too aggressively, which encourages channeling: water carves preferential paths through the coffee, over-extracting some of it and under-extracting the rest. Owners consistently report gushing shots and harsh, uneven flavor as the stock symptoms, especially with lighter roasts. If that taste profile sounds familiar, our sour vs bitter diagnostic guide explains what you are tasting.
Who still needs it, as of 2026. Machines up to and including the 2019-2022 Classic Pro: yes. The 2023 Classic Evo Pro: no, it ships with a 9 bar spring already fitted. Bought used and unsure: measure, because a previous owner may have done this already. This is the one rung of the ladder where the internet's collective advice is now out of date for a meaningful share of readers.
What the mod is. The OPV is a spring-loaded valve, and a stiffer spring means a higher relief pressure. The mod replaces the stock spring with one calibrated for roughly 9 bar. The best-known source is Shades of Coffee, the UK shop run by the community member known as MrShades, whose kit includes both a 9 bar and a 6.5 bar spring so you can experiment with lower-pressure extraction. Note the kit has a Standard version (just springs) and a PLUS version that adds a silicone pipe and bung for machines showing only one pipe in the water tank: check your tank before ordering. In the US, Distro Coffee Labs sells a 9 bar and 6 bar pair on Amazon for 2018-and-newer machines. The community's standing warning applies to whatever you buy: uncalibrated clones circulate, so buy from a source that states its pressure rating and its fitment years.
Difficulty and time. This is the gentlest introduction to working inside the machine: remove the top cover, disconnect the OPV, swap the spring, reassemble. Most owner accounts put it at 15-30 minutes with basic hand tools, typically a 10mm wrench and a screwdriver.
Verdict. On a pre-2023 machine it is the closest thing to a unanimous recommendation in home espresso: cheap, quick, low risk relative to the other mods, and the flavor improvement on light and medium roasts is the most commonly cited payoff. On an Evo Pro it is a purchase with no effect, which is exactly why the measurement step above is worth ten minutes.
Mod 2: PID temperature control
The problem it solves. Every generation of the Classic, the 2023 Evo Pro included, controls brew temperature with a simple thermostat that clicks the heating element on and off across a wide band. Depending on where in that cycle you pull your shot, brew water can vary by a large margin, and temperature is one of the main levers of extraction. Owners work around this with temperature surfing: flipping the steam or brew switch, watching the light, and counting seconds to catch the boiler at a repeatable point in its cycle. It works, but it is a ritual you perform every single shot, and it is the single most cited annoyance in stock-Classic ownership. Because the Evo Pro fixed the pressure problem and not this one, a PID is now the *first* mod on a current machine rather than the second.
What a PID does. A PID (proportional-integral-derivative) controller replaces the thermostat's crude on-off cycling with a feedback loop that holds the boiler within roughly a degree of a setpoint you choose. Practical benefits owners report: shot-to-shot consistency, the ability to deliberately run hotter for light roasts and cooler for dark roasts, and the end of temperature surfing entirely. Many kits also add a readout and steam-temperature control.
The three kits worth knowing.
- Sungaze PID kit: the US-shipped option on Amazon, around $170 as of mid-2026 for the brew, steam and flow version. Ships an XMT7100 controller and enclosure, a PT100 Class A RTD probe, both solid-state relays, and a flow-control switch for pre-infusion, listed for the Classic, Classic Pro and Evo Pro
- Auber Instruments KIT-GGP: the long-standing US option, listed at $189.50 as of mid-2026 for the version with programmable pre-infusion (pulse, soak and brew stages), plus steam temperature control and a ±1° brew readout
- MrShades / Shades of Coffee PID kit: the community default in most r/espresso threads and roughly $150-200 landed in the US depending on version and shipping from the UK. Designed for the Classic specifically, with detailed photo instructions, and uses crimped spade connectors rather than solder
Difficulty. A meaningful step up from the OPV swap. You are mounting a controller box, routing a temperature sensor to the boiler, and re-wiring heating-element circuits inside a mains appliance. No soldering is required with the mainstream kits, but you must be comfortable following a wiring diagram exactly and crimping or seating connectors firmly. Owner reports put a careful first-time install at one to three hours. If you are not confident, this is the mod where paying for a pre-modded machine makes the most sense.
Verdict. The consensus upgrade that takes the Classic from temperamental to genuinely consistent. The standing joke that the Classic is 'not recommended stock' in community wikis was always really a statement about these first two mods, and now that Gaggia has done one of them at the factory, the PID carries that argument on its own.
Mod 3: the quality-of-life layer
None of these require opening the case, which makes them the zero-risk tier: no warranty implications, no wiring, no mains electricity. They are also the tier people buy first and should buy last.
Bottomless (naked) portafilter, roughly $25-45. Replaces the spouted portafilter with one that exposes the basket's underside. It is primarily a diagnostic tool: channeling, uneven tamping, and distribution problems that are invisible with spouts become obvious as spritzing and uneven flow. The Classic takes a commercial-style 58mm portafilter, so options are plentiful; just confirm the listing states your model by name, since ear geometry varies between brands and several listings exclude post-2015 machines. If you want the tamper, funnel and distributor alongside it, KNODOS sells a four-piece set listed for the Classic, Classic Pro and Evo Pro together.
Precision basket, roughly $25-40. Aftermarket baskets from established names like IMS are machined with more consistent hole patterns than stock baskets. The community consensus is honest here: it is a refinement, not a transformation. Worth it once puck prep is solid, mostly for more even extraction and easier dialing. Match the basket's dose band to how you actually brew rather than buying 18g by default, and note that most IMS baskets are ridgeless, so they sit against the portafilter's retaining clip rather than locking into a groove.
Puck screen, roughly $12-25. A thin mesh disc that rests on top of the puck. It spreads the first contact of water and keeps the shower screen dramatically cleaner, which is a real maintenance win. Treat any claim beyond that with suspicion: it is not a channeling fix, and it will not compensate for skipping distribution. If your shots run uneven, the sour vs bitter fix ladder is the honest place to start, and puck prep tools belong to that conversation rather than this one.
Steam wand upgrades: know your machine's year.
- Pre-2019 Gaggia Classic (including the 2015-2018 RI9403 era): these shipped with a plastic panarello attachment that auto-froths and fights real microfoam. The classic fix, documented across forums for years, is fitting a Rancilio Silvia steam arm (part number 1449141), a bolt-on swap that costs roughly $20-50 in parts as of mid-2026
- 2019+ Classic Pro and Evo Pro: Gaggia fitted a proper commercial-style two-hole wand at the factory, so the famous wand swap is obsolete on current machines. Owners who steam a lot of milk sometimes fit aftermarket tips or handles, but it is optional polish, not a fix
Steam performance is one place where the Classic genuinely trails competitors like the Bambino Plus regardless of wand, since its small single boiler needs time to transition between brewing and steaming. No wand fixes a boiler size.
Pre-modded, DIY, or skip: an honest decision
DIY if the project appeals to you on its own. On a pre-2023 machine the all-in cost of the full ladder is roughly $250-350 on top of the machine; on an Evo Pro it is closer to $200-300 because the spring rung is already paid for. Either way the process teaches you how your machine actually works, which pays off every time something needs maintenance.
Buy pre-modded if you want the results without the wiring. Reputable sellers on communities like r/espresso's marketplace and some specialty shops sell Classics with the OPV and PID work done. You pay a premium for labor, but the warranty was going to be voided either way, and a competent installer's work inside a mains appliance is worth paying for if that is not your skill set. Ask which generation the base machine is: paying a labor premium for an OPV swap on an Evo Pro is paying for nothing.
Skip modding if what you actually want is convenience. A stock Classic with good technique makes real espresso, and if temperature surfing and spring swaps sound like chores rather than fun, the honest answer is that a different machine fits you better. Our three-way comparison of the Bambino, Classic Pro, and Barista Express is built around exactly that question, and if your shots taste off in the meantime, start with why espresso tastes sour vs bitter before blaming the hardware.
Gaggia Classic Pro mods: FAQ
Do Gaggia Classic Pro mods void the warranty?
Yes. Opening the case and altering the OPV or wiring voids the manufacturer warranty. That is a real cost of modding a new machine, and it is why some owners buy used or pre-modded units instead. The zero-risk tier (bottomless portafilter, precision basket) does not involve opening the machine and does not affect warranty.
Is the 9 bar OPV mod worth it on the Gaggia Classic Pro?
On a Classic or Classic Pro from 2022 or earlier, it is the closest thing to a unanimously recommended mod in home espresso: for roughly $15-30 and half an hour, it brings brew pressure down from the elevated factory setting to the 9 bar standard, which owners consistently report reduces channeling and harshness, especially on lighter roasts. On a 2023 or newer Classic Evo Pro it is worth nothing, because that machine ships with a 9 bar OPV spring already fitted.
Do I need a PID on the Gaggia Classic Pro?
Need, no. The workaround is temperature surfing: timing your shot against the boiler's thermostat cycle. A PID replaces that ritual with a stable setpoint and is the biggest consistency upgrade available for the machine, at roughly $145-200 as of mid-2026 plus a one-to-three hour install. On a 2023+ Evo Pro it is now the first mod worth doing rather than the second, since the factory already handled the pressure side. Many owners run stock for months first, then add the PID once they are sure they are keeping the machine.
Can you buy a Gaggia Classic Pro already modded?
Yes. Pre-modded units with the OPV spring and PID installed circulate on enthusiast marketplaces, and some specialty sellers offer modding as a service. You pay a labor premium, but for anyone uncomfortable working inside a mains-powered appliance it is the sensible route, and we would rather recommend it than talk someone nervous into DIY electrical work.
What pressure should the Gaggia Classic Pro run at?
The espresso standard is roughly 9 bar at the puck, which is what the 9 bar spring targets. One detail worth knowing: on a static (no-flow) pressure gauge test, a correctly calibrated 9 bar valve reads about 1 bar higher, since pressure drops once water actually flows through coffee. Some owners also experiment with the 6.5 bar spring included in the Shades of Coffee kit for lower-pressure, slower shots.
Does the Gaggia Classic Evo Pro still need the 9 bar OPV mod?
No. The Classic Evo Pro, introduced in 2023, ships with a new over-pressure valve set for 9 bar extraction from the factory, which is the change Gaggia led the revision with. Fitting an aftermarket 9 bar spring to a machine that already has one gains you nothing. The Evo Pro revision also brought a polished stainless steel 58mm commercial portafilter in place of the older chrome-plated brass one, a steel cover around the brew group, and an anti-scale coating inside the boiler. It did not change temperature control, so a PID is still the meaningful upgrade on that machine.
How do I check the brew pressure on a Gaggia Classic?
Lock a blind basket (a solid 58mm disc with no holes) into your portafilter, fit a brew pressure gauge, run the pump, and read the needle once it settles. That gives you static, no-flow pressure. Read it knowing the offset: a correctly calibrated 9 bar valve reads about 1 bar higher on a static test, roughly 10 bar, because pressure drops once water has to flow through coffee. A static reading of 12-13 bar is the over-pressure condition the spring swap exists to fix. Gauges come as a portafilter-threaded unit or as an inline gauge on the pump line, and thread fitment varies between portafilters, so check compatibility before buying.